
Running WireGuard VPN (with ad-blocking) on Kubernetes
WireGuard
So, after being back from a recent vacation trip and having to use the hotel Wi-Fi on my mobile phone, I once more started thinking about setting up a VPN endpoint for myself. I simply don’t trust “foreign” Wi-Fi hotspots.
A few years ago I kept a simple OpenVPN installation up and running on a DigitalOcean droplet, but let it deteriorate and stopped using it at some point. Also because of the Coronavirus pandemic that started last year there wasn’t much travelling around anyway, thus I had no immediate need for a VPN.
But thanks to the wonders of modern medicine (thank you very much Katalin Karikó! 👍️) the situation has changed this summer and I was once again able to travel abroad. Which led to my decision to once more setup a VPN endpoint for myself. 😆
The question was, what software to pick and how do I deploy and operate it this time?
… enter WireGuard!
From https://www.wireguard.com
WireGuard® is an extremely simple yet fast and modern VPN that utilizes state-of-the-art cryptography. It aims to be faster, simpler, leaner, and more useful than IPsec, while avoiding the massive headache. It intends to be considerably more performant than OpenVPN. WireGuard is designed as a general purpose VPN for running on embedded interfaces and super computers alike, fit for many different circumstances. Initially released for the Linux kernel, it is now cross-platform (Windows, macOS, BSD, iOS, Android) and widely deployable. It is currently under heavy development, but already it might be regarded as the most secure, easiest to use, and simplest VPN solution in the industry.
WireGuard aims to be as easy to configure and deploy as SSH. A VPN connection is made simply by exchanging very simple public keys – exactly like exchanging SSH keys – and all the rest is transparently handled by WireGuard. It is even capable of roaming between IP addresses, just like Mosh. There is no need to manage connections, be concerned about state, manage daemons, or worry about what’s under the hood. WireGuard presents an extremely basic yet powerful interface.
A combination of extremely high-speed cryptographic primitives and the fact that WireGuard lives inside the Linux kernel means that secure networking can be very high-speed. It is suitable for both small embedded devices like smartphones and fully loaded backbone routers.
It’s the year 2021 after all, using anything other than WireGuard as your VPN is utterly silly.
WireGuard on Kubernetes
Well, these days I’ve more or less migrated almost of all my projects onto my own personal Kubernetes cluster. Whether it’s just to use it for config management purposes or more actual technical reasons is moot at this point. So Kubernetes it is!
But then the question is, how do I run WireGuard on Kubernetes?
I’ve looked at various solutions on how to go about it, some of them included the following:
- linuxserver/wireguard
- Docker image managed by the LinuxServer.io team, with regular updates, server and client mode, and configuration done mostly through ENV variables.
- WG UI
- Complete WireGuard web UI for self-serve client configurations, with optional auth.
- WireGuard-UI
- Another web user interface to manage your WireGuard setup.
- Algo VPN
- A collection of scripts for easy setup of a personal WireGuard or IPSec VPN. Turned out to not really be useful for my intended purpose or running a minimal server on Kubernetes.
- masipcat/wireguard-go
- Simple prebuilt image to run as a WireGuard server, provides a basic Kubernetes deployment example.
- cmulk/wireguard-docker
- Another simple prebuilt image to use as a personal WireGuard server.
Ultimately I decided on masipcat/wireguard-go, because at its core it is a really simple and uncomplicated prebuilt Docker image, and also directly provides a Kubernetes deployment example that works out of the box.
The first you need to do when setting up WireGuard is to prepare a configuration file for your server:
server.conf
# Server configuration
[Interface]
# The (internal) IP we want to give the VPN server itself
Address = 10.10.0.1/24

# The port the server should listen to, 51820 is the default for WireGuard
ListenPort = 51820

# The private key of the server
PrivateKey = 4N9FtwbtC9iY9P1C85l1QmM0OxlGRT0cHVjEuRbLuVA=

# (De)initialize iptables rules for routing the VPN traffic
PostUp = iptables -t nat -A POSTROUTING -s 10.10.0.0/24 -o eth0 -j MASQUERADE
PostDown = iptables -t nat -D POSTROUTING -s 10.10.0.0/24 -o eth0 -j MASQUERADE


# Configure one or multiple VPN clients with a [Peer] entry for each.
# For this example we only configure 1 client
[Peer]
# The public key of the client you want to let connect to the server
PublicKey = 8EiAxqTGhKFJeLhDDaZcuEVqpGJK1qrq8Ht299J7Q2o=

# The (internal) IP we want this client to have
AllowedIPs = 10.10.0.5/32
As you can see from the server config example above we’ve chosen the network 10.10.0.0/24 to be our Wireguard VPN network. The server itself and all clients should be configured to IPs within that subnet. The server itself is defined as the gateway with 10.10.0.1/24, and then for each client (peer) you configure a specific /32-IP in that subnet to be assigned. This IP will need to be reflected also in the client config file.
The public and private keys needed for the server and clients can be generated by using wg, which is usually part of the WireGuard tools package of your chosen Linux distribution.
$ wg genkey | tee private.key | wg pubkey > public.key
Kubernetes deployment
To deploy WireGuard with this configuration onto Kubernetes we have to prepare a few resources defined in a yaml file:
wireguard.yml
---
#! Deployment definition for WireGuard for a single instance container.
#! Configuration data from a secret gets mounted as files into the container.
#! The init container ensures forwarding is enabled.
apiVersion: apps/v1
kind: Deployment
metadata:
  name: wireguard
  namespace: wireguard
  labels:
    app: wireguard
spec:
  replicas: 1
  strategy:
    type: Recreate
  selector:
    matchLabels:
      app: wireguard
  template:
    metadata:
      labels:
        app: wireguard
    spec:
      restartPolicy: Always
      initContainers:
      - name: init
        image: busybox:1.32.0
        command:
        - sh
        - -c
        - sysctl -w net.ipv4.ip_forward=1 && sysctl -w net.ipv4.conf.all.forwarding=1
        securityContext:
          privileged: true
          capabilities:
            add:
            - NET_ADMIN
      containers:
      - name: wireguard
        image: masipcat/wireguard-go:latest
        securityContext:
          privileged: true
          capabilities:
            add:
            - NET_ADMIN
        ports:
        - containerPort: 51820
          protocol: UDP
        command:
        - sh
        - -c
        - /entrypoint.sh
        env:
        - name: LOG_LEVEL
          value: info
        resources:
          requests:
            memory: "64Mi"
            cpu: "150m"
          limits:
            memory: "128Mi"
        volumeMounts:
        - name: wireguard-config
          mountPath: /etc/wireguard/wg0.key
          subPath: wg0.key
          readOnly: true
        - name: wireguard-config
          mountPath: /etc/wireguard/wg0.conf
          subPath: wg0.conf
          readOnly: true
      volumes:
      - name: wireguard-config
        secret:
          secretName: wireguard

---
#! Secret containing all configuration data for WireGuard, to be mapped as volume/files into container
apiVersion: v1
kind: Secret
metadata:
  name: wireguard
  namespace: wireguard
  labels:
    app: wireguard
type: Opaque
stringData:
  wg0.key: 4N9FtwbtC9iY9P1C85l1QmM0OxlGRT0cHVjEuRbLuVA=
  wg0.conf: |
    [Interface]
    Address = 10.10.0.1/24
    ListenPort = 51820
    PostUp = wg set wg0 private-key /etc/wireguard/wg0.key && iptables -t nat -A POSTROUTING -s 10.10.0.0/24 -o eth0 -j MASQUERADE
    PostDown = iptables -t nat -D POSTROUTING -s 10.10.0.0/24 -o eth0 -j MASQUERADE
    SaveConfig = false

    [Peer]
    PublicKey = 8EiAxqTGhKFJeLhDDaZcuEVqpGJK1qrq8Ht299J7Q2o=
    AllowedIPs = 10.10.0.5/32

---
#! Service definition for WireGuard, exposes its UDP port as a NodePort service externally on <NodeIP:31820>
apiVersion: v1
kind: Service
metadata:
  name: wireguard
  namespace: wireguard
  labels:
    app: wireguard
spec:
  type: NodePort
  selector:
    app: wireguard
  ports:
  - port: 51820
    targetPort: 51820
    nodePort: 31820
    protocol: UDP
I’m using ytt to do all my templating and then deploy and manage all my Kubernetes resources with kapp. The templates I wrote for deploying WireGuard onto Kubernetes are available here on GitHub: WireGuard ytt templates
We are going to just directly deploy without doing any templating for this example to keep it brief:
kubectl -n wireguard apply -f wireguard.yml
Your very own personal WireGuard VPN server should now be up and running, reachable on the NodePort IP and port 31820 as per our Kubernetes service definition.
$ nc -uvz 1.2.3.4 31820
Connection to 1.2.3.4 31820 port [udp/wireguard] succeeded!
AdGuard Home
AdGuard Home is a network-wide software for blocking ads and tracking. When using it as your main DNS server it allows you to take advantage of system-wide ad-blocking on all your devices and you don’t need any client-side software. It operates as a DNS server that blocks predefined ad and tracker domains using the “DNS sinkholing” method, thus preventing your devices from ever connecting to those servers.
In terms of functionality it is very similar to the more well-known Pi-Hole but much easier to setup and operate, especially in regards to Kubernetes deployments.
AdGuard Home is open source and can be found on GitHub: https://github.com/AdguardTeam/AdGuardHome
AdGuard Home on Kubernetes
Of course we also want to run AdGuard Home on Kubernetes, same as with WireGuard before. The main reason being that we want to be able to configure AdGuard Home as the sole DNS for established WireGuard VPN connections, forcing the clients to resolve all DNS queries via AdGuard Home and thus blocking ads.
Kubernetes deployment
AdGuard Home is available as a ready-to-use image on Docker Hub: https://hub.docker.com/r/adguard/adguardhome
In order to deploy it on Kubernetes we again have to prepare a yaml file with a few resources defined:
adguard.yml
---
#! Deployment definition for AdGuard Home for a single instance container,
#! storing configuration data on a persistent volume claim.
#! The management web interface on port 3000 and the DNS port 53
#! are be made accessible via Kubernetes service definition, see further below.
apiVersion: apps/v1
kind: Deployment
metadata:
  name: adguardhome
  namespace: adguardhome
  labels:
    app: adguardhome
spec:
  replicas: 1
  strategy:
    type: RollingUpdate
    rollingUpdate:
      maxUnavailable: 1
      maxSurge: 0
  selector:
    matchLabels:
      app: adguardhome
  template:
    metadata:
      labels:
        app: adguardhome
    spec:
      containers:
      - name: adguardhome
        image: adguard/adguardhome:v0.106.3
        securityContext:
          privileged: false
          allowPrivilegeEscalation: false
        ports:
        - containerPort: 3000
          protocol: TCP
        - containerPort: 53
          protocol: UDP
        resources:
          requests:
            memory: "128Mi"
            cpu: "200m"
          limits:
            memory: "256Mi"
        readinessProbe:
          httpGet:
            path: /
            port: 3000
        livenessProbe:
          httpGet:
            path: /
            port: 3000
        volumeMounts:
        - name: adguardhome-config
          mountPath: /opt/adguardhome/conf
        - name: adguardhome-logs
          mountPath: /opt/adguardhome/work
      volumes:
      - name: adguardhome-config
        persistentVolumeClaim:
          claimName: adguardhome
      - name: adguardhome-logs
        emptyDir: {}

---
#! Persistent volume claim to store all AdGuard Home configuration data
apiVersion: v1
kind: PersistentVolumeClaim
metadata:
  name: adguardhome
  namespace: adguardhome
  labels:
    app: adguardhome
spec:
  accessModes:
  - ReadWriteOnce
  resources:
    requests:
      storage: 2Gi

---
#! Service definition for the AdGuard Home web interface and DNS port
apiVersion: v1
kind: Service
metadata:
  name: adguardhome
  namespace: adguardhome
  labels:
    app: adguardhome
spec:
  type: ClusterIP
  selector:
    app: adguardhome
  ports:
  - port: 3000
    targetPort: 3000
    protocol: TCP
  - port: 53
    targetPort: 53
    protocol: UDP

---
#! Ingress resource, used for HTTP(S) access to the AdGuard Home web interface via Kubernetes ingress-controller
#! https://kubernetes.io/docs/concepts/services-networking/ingress-controllers/
apiVersion: networking.k8s.io/v1beta1
kind: Ingress
metadata:
  name: adguardhome
  namespace: adguardhome
  labels:
    app: adguardhome
  annotations:
    #! Modify "cert-manager.io/cluster-issuer" to match your certificate ClusterIssuer if you are using cert-manager,
    #! otherwise remove it entirely
    cert-manager.io/cluster-issuer: letsencrypt-prod
    #! Modify "kubernetes.io/ingress.class" to match your ingress-controller
    kubernetes.io/ingress.class: nginx
    nginx.ingress.kubernetes.io/force-ssl-redirect: "true"
    nginx.ingress.kubernetes.io/ssl-redirect: "true"
spec:
  tls:
  - hosts:
    #! Configure the hostname for the AdGuard Home web interface
    - adguardhome.my-example-domain.com
    secretName: adguardhome-tls
  rules:
  #! Configure the hostname for the AdGuard Home web interface
  - host: adguardhome.my-example-domain.com
    http:
      paths:
      - backend:
          serviceName: adguardhome
          servicePort: 3000
Same as before with WireGuard I’m using a collection of ytt template files and do my deployment with kapp. The complete set of templates can be found here: AdGuard Home ytt templates
Again though, for this example here we are just directly deploying the above yaml file without any templating:
kubectl -n adguard apply -f adguard.yml
And just like that we’ve now got an DNS ad-blocker deployment up and running! 🥳
Use it with your Android phone
WireGuard clients exist for a large variety of operating systems and devices. It’s easy to use it as your VPN on any Windows, Linux, OSX, iOS or Android device. Simply download and install a client for the platform of your choice: https://www.wireguard.com/install/
One of the more interesting use-cases would be to use it as a VPN for your mobile phone. For Android the best way is to use the official client, maintained by the WireGuard devs themselves: the Android WireGuard app
What are the benefits of doing this?
So at this point you might wonder why doing all of this in the first place, why would you run your own VPN server and DNS ad-blocker on the internet? Why connect to it with your phone?
There are various reasons for running this on my Kubernetes cluster (besides it being a fun project to thinker with), but the most important ones are these:
- Secure network traffic in “foreign” networks, wifi, etc. for your phone
- All traffic will go through the VPN connection and exit on your “trusted” Kubernetes cluster, instead of being at the mercy of whatever hotel or office Wi-Fi you are currently using with your phone for example.
- System-wide ad-blocking via DNS on Android!
- Having a DNS server that does ad-blocking being used as the sole DNS for the VPN connection means that you automatically get a system-wide ad-blocker for your Android phone. No more pesky ads in the browser or even within any apps themselves!
- The DNS server is cluster-internal
- Since the DNS server is only exposed via its clusterIP that means it is not accessible to the outside world. No one can reach and abuse our DNS server. We are able to connect to the DNS from our WireGuard endpoint as that is running in a container inside the cluster, but no one else can!
Let’s get started on preparing a client configuration file for your phone:
client.conf
# Client configuration
[Interface]
# Assign the IP as configured on the server config for this peer
Address = 10.10.0.5/32

# The private key of this client (its corresponding public key is in the server config for this peer)
PrivateKey = wMq8AvPsaJSTaFEnwv+J535BGZZ4eWybs5x31r7bhGA=

# DNS server the VPN client should use once connected.
# In our case this is the ClusterIP of our AdGuard Home Kubernetes service
DNS = 10.0.15.31


# The VPN server we want to connect to
[Peer]
# The public key of the server you want to connect to
PublicKey = uJ0bUIe8Kc+vp27sJVDLH8lAmo4E3dfGtzRvOAGQZ0U=

# The IP that points to our WireGuard pod on Kubernetes, could be a K8s LoadBalancer IP, ClusterIP, etc..
# In our case it is the node IP directly as we used a NodePort
Endpoint = 1.2.3.4:31820

# What IPs/subnet should be routed through the VPN? Use "0.0.0.0/0, ::/0" for all traffic
AllowedIPs = 0.0.0.0/0, ::/0

# Keep the connection alive through NAT and firewalls by sending a keepalive packet every 25 seconds
PersistentKeepalive = 25
As you can see in the example above with the DNS entry we’ve defined which DNS server should be used by the client once the VPN connection is established. In this case it is the IP under which our AdGuard Home DNS server is reachable, and thus we have now DNS-based ad-blocking automatically included for all our VPN traffic/connections.
qrencode
Once we have the client config file ready our next step is to import it into the WireGuard app on your phone.
The easiest way to do this is with a QR-code. We’ll install qrencode for this:
# pacman -S qrencode
resolving dependencies...
looking for conflicting packages...

Packages (1) qrencode-4.1.1-1

Total Installed Size:  0.10 MiB
Net Upgrade Size:      0.00 MiB

:: Proceed with installation? [Y/n] Y
(1/1) checking keys in keyring                            [##############################] 100%
(1/1) checking package integrity                          [##############################] 100%
(1/1) loading package files                               [##############################] 100%
(1/1) checking for file conflicts                         [##############################] 100%
(1/1) checking available disk space                       [##############################] 100%
:: Processing package changes...
(1/1) installing qrencode                                 [##############################] 100%
:: Running post-transaction hooks...
(1/1) Arming ConditionNeedsUpdate...
Now let’s use it to generate a QR-code picture of our config file, displaying it either directly in the terminal:
$ qrencode -t ANSIUTF8 -r client.conf
[QR CODE in terminal]
Or by writing it to a PNG file to display:
$ qrencode -t PNG -r client.conf -o client_conf.png

Simply scan the resulting QR-code with the WireGuard app on your phone to import the client configuration.
After importing you can then connect to the VPN and enjoy an ad-free internet experience on your whole Android phone, be it in the browser or inside apps! 😃
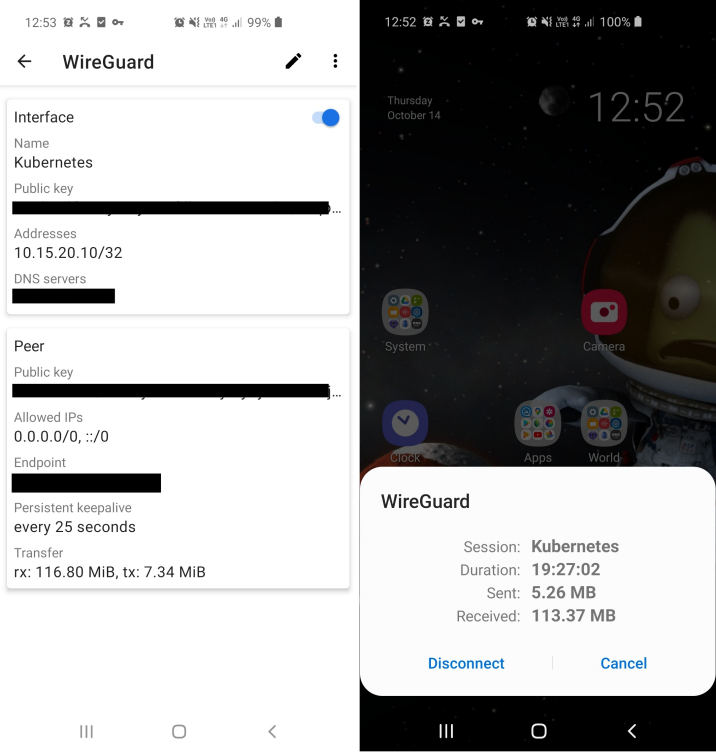
WireGuard is very fast, stable and also handles reconnects gracefully, allowing you to basically have the VPN connection open 24/7.