
Deploy a K3s cluster with Terraform
Since Infrastructure-as-Code is all the rage out there (and for good reason, you’re a fool if your entire tech stack is not 100% rebuildable and reproducible in an idempotent way!), I’ve always wondered if I should write and open-source a project that’s written entirely as a Terraform module only and that would spin up a Kubernetes cluster on Swisscom’s public Infrastructure-as-a-Service offering, DCS+ (Dynamic Computing Services), which is based on VMware vCloud Director.
Behold: ✨ https://github.com/JamesClonk/terraform-vcloud-kubernetes 🎉
The resulting Terraform module supports you in creating a Kubernetes cluster with K3s on Swisscom DCS+ infrastructure. It sets up all necessary infrastructure on DCS+ through the vCloud provider, then installs K3s on all VMs and joins them into a Kubernetes cluster, and finally also installs and manages additional Helm charts on the cluster, such as cilium, ingress-nginx, cert-manager, longhorn, and a whole set of logging/metrics/monitoring related components.
K3s
A quick recap: What is K3s?
K3s is a lightweight, CNCF certified Kubernetes distribution created by Rancher Labs, that is highly available and designed for production workloads in unattended, resource-constrained, remote locations or inside IoT appliances. It is built and packaged into a single small binary with low resource requirements and very easy to install, run and auto-update a production-grade Kubernetes cluster with.
If you want to know more about how I’ve used K3s before, have a look at my previous blog post about my own personal Kubernetes, with K3s.
Terraform
Another quick recap: What is Terraform?
Terraform is (arguably) the most popular open-source Infrastructure-as-Code tool out there. It allows to easily define, provision and manage your entire infrastructure using a declarative configuration language. It works out-of-the-box with most of the well-known infrastructure provider like GCP, AWS, Azure, etc. and all of their services. Terraform functionality and support for different infrastructure platforms and resources can also easily be extended by installing additional Terraform provider plugins.
If you want to know more about Terraform, have a look at another one of my previous blog posts: Setting up NSX-T Distributed Firewall with Terraform.
VMware vCloud Director
VMware vCloud Director (vCD) is a tool with which you can build your own Infrastructure-as-a-Service platform, that can provide and manage on-premise infrastructure and virtual data centers, containing all the necessary building blocks for a “cloud” service, such virtual machines, disks, networks, firewalls, loadbalancers, deployments and automation.
vCD allows you to turn existing data centers into scalable and elastic software-defined virtual data centers (so called VDCs). With it you can convert and combine all your physical data center resources, VMware vSphere and vCenters, NSX networks, storage, etc., into VDC resources which you then make available to developers and users through a web portal or API.
In short, it basically enables you to have your own on-premise “cloud”, comparable in capability to well-known medium-scalers like DigitalOcean, Linode, Hetzer, Exoscale, Scaleway, etc..
It provides a solid web UI, a mostly modern and useful API (for VMware or typical enterprisey-sluggish standards anyway), and has an official Terraform provider for vCloud that allows full control over all its resources and features with Terraform. And while I’m not privy to the efforts needed behind the scenes to run and operate it (having to deal with VMware vSphere, vCenter, NSX-V/T, etc. is not something I would particularly envy), I can say that at least vCD from a developer and end-user perspective is very nice and productive to work with. It provides you with all the basic components you’d usually expect from an Infrastructure-as-a-Service provider and allows you to build and deploy your own platform and software solutions on top of it.
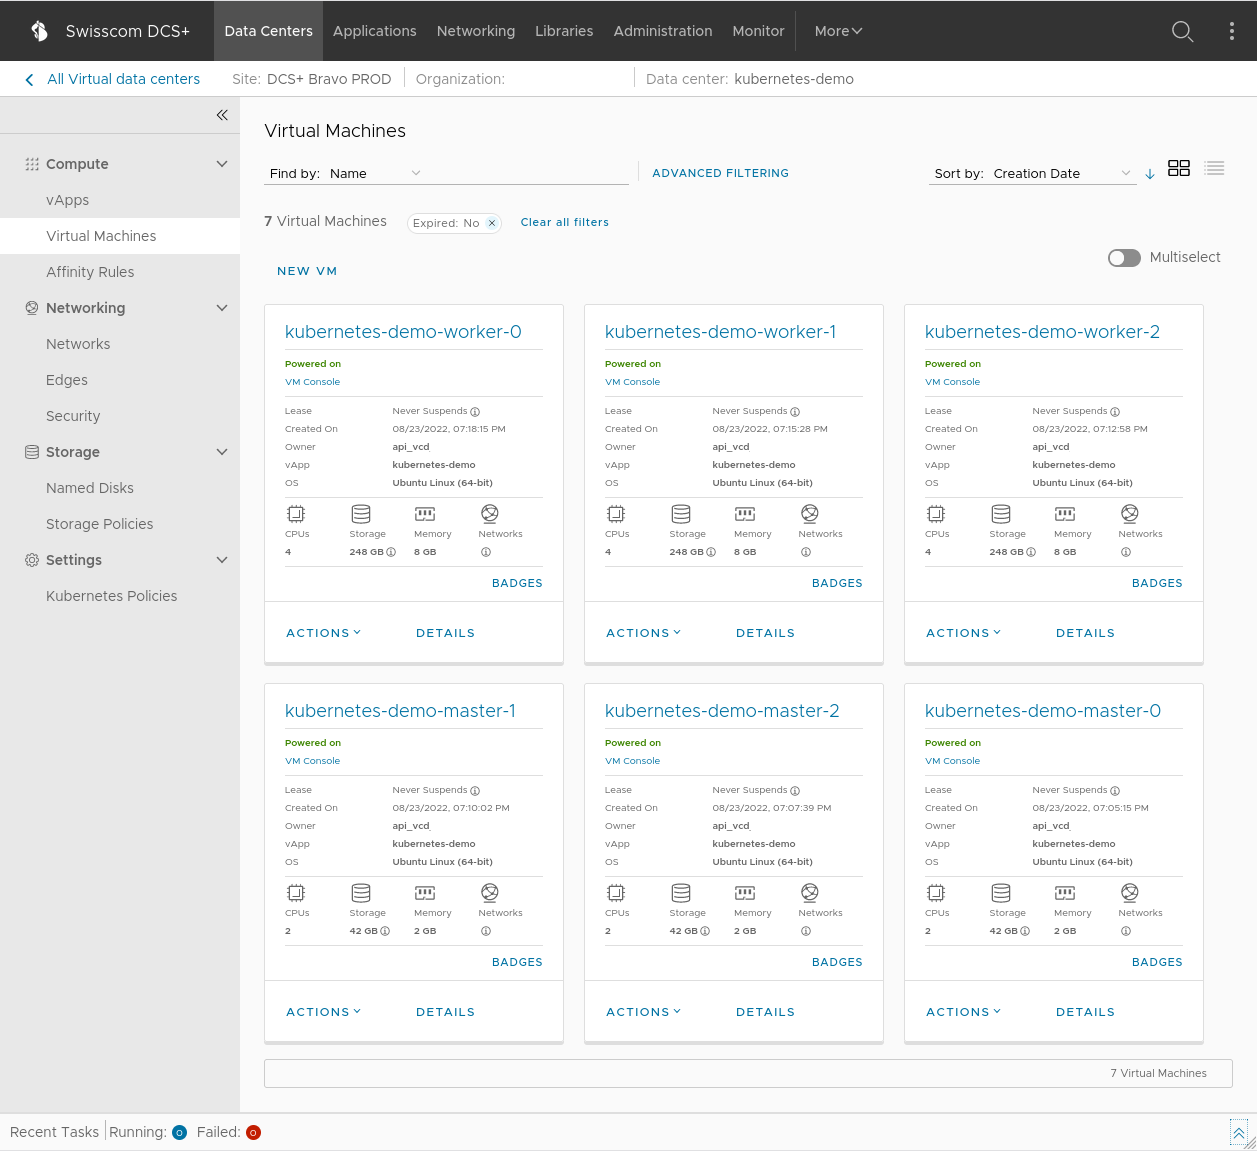
Here’s a screenshot of the vCD web portal, and how it might look like after a successful Kubernetes cluster deployment:
Putting it all together
Now that we know what building blocks to use, how do we put this all together into a Terraform module?
I’ve decided that I wanted to split up the module into 3 different parts:
- Handing infrastructure with vCloud
- Setting up Kubernetes with K3s
- Additional deployments with Helm charts
Each of these is a Terraform submodule contained within the main repository.
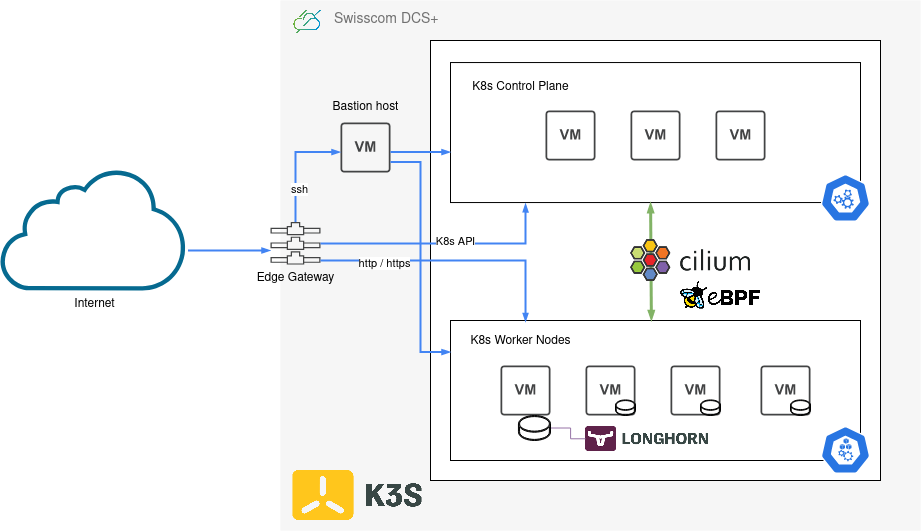
The infrastructure module will provision resources on vCD and setup a private internal network, attach an Internet-facing LoadBalancer with NATing and additional firewall rules, deploy a bastion host for external SSH access into the private network, and finally a set of Kubernetes control plane and worker VMs for hosting the actual cluster.
The kubernetes module will then connect via SSH over the bastion host to all those control plane and worker nodes and install a K3s Kubernetes cluster on them. I’ve found and used another helpful K3s Terraform module for this, to take care of setting up and managing a K3s cluster on the virtual machines.
Finally the deployments module is responsible for installing system components and additional software on to the Kubernetes cluster via the official Terraform Helm provider plugin. It does most of its work with the Helm charts of each component, plus some additional customization directly via kubectl and manifests.
The final result is a fully functioning, highly available Kubernetes cluster, complete with all the batteries included you need to get you started in the world of Kubernetes. Ingress Controller for HTTP virtual hosting / routing, TLS certificate management with automatic Let’s Encrypt certificates for all your HTTPS traffic, PersistentVolume and storage management with optional backups, and an entire monitoring stack for metrics and logs.
K3s on vCloud
The cluster is up and running
After following the documentation in the readme and installation instructions and applying the Terraform module you’ll see a couple of useful hints and URLs as a starting point to make use of your new cluster:
Outputs:

cluster_info = "export KUBECONFIG=kubeconfig; kubectl cluster-info; kubectl get pods -A"
grafana_admin_password = "export KUBECONFIG=kubeconfig; kubectl -n grafana get secret grafana -o jsonpath='{.data.admin-password}' | base64 -d; echo"
grafana_url = "https://grafana.my-kubernetes.my-domain.com"
kubernetes_dashboard_token = "export KUBECONFIG=kubeconfig; kubectl -n kubernetes-dashboard create token kubernetes-dashboard"
kubernetes_dashboard_url = "https://dashboard.my-kubernetes.my-domain.com"
loadbalancer_ip = "147.5.206.133"
longhorn_dashboard = "export KUBECONFIG=kubeconfig; kubectl -n longhorn-system port-forward service/longhorn-frontend 9999:80"
Have a look at the kubernetes-dashboard, one of the many additional components that’s included in the deployment:

We’ve got a new Kubernetes cluster up and running! 🥳
Automated testing
Now, I’ve you’ve read some of my other blog posts here you’ll know that I’m a big fan of automation. Automate all the things! 🛠️⚙️✈️
So naturally I’ve also added an entire pipeline with GitHub Actions that gets triggered on every commit and pull request on the repository and ensures everything is working as expected.
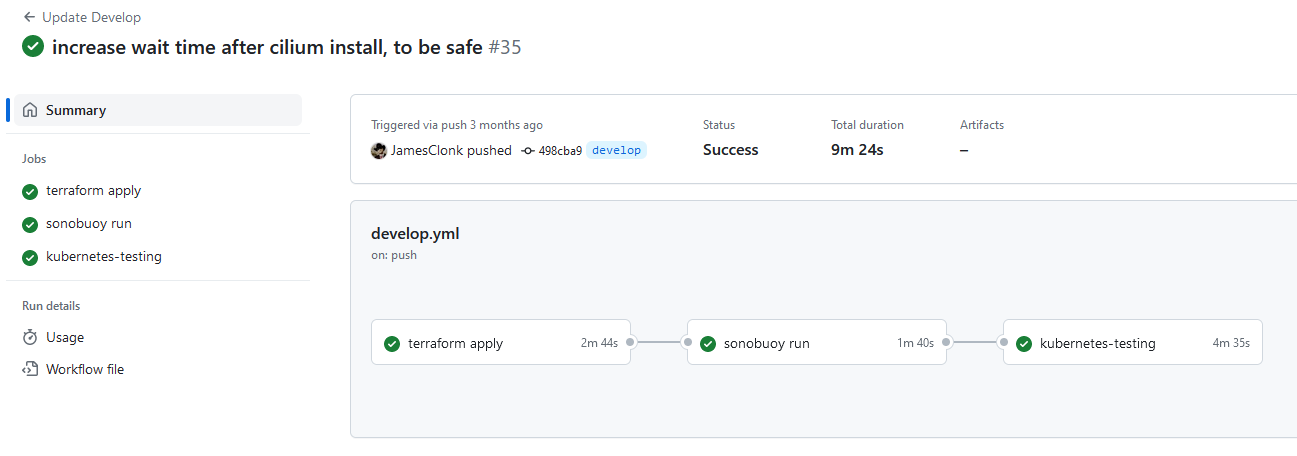
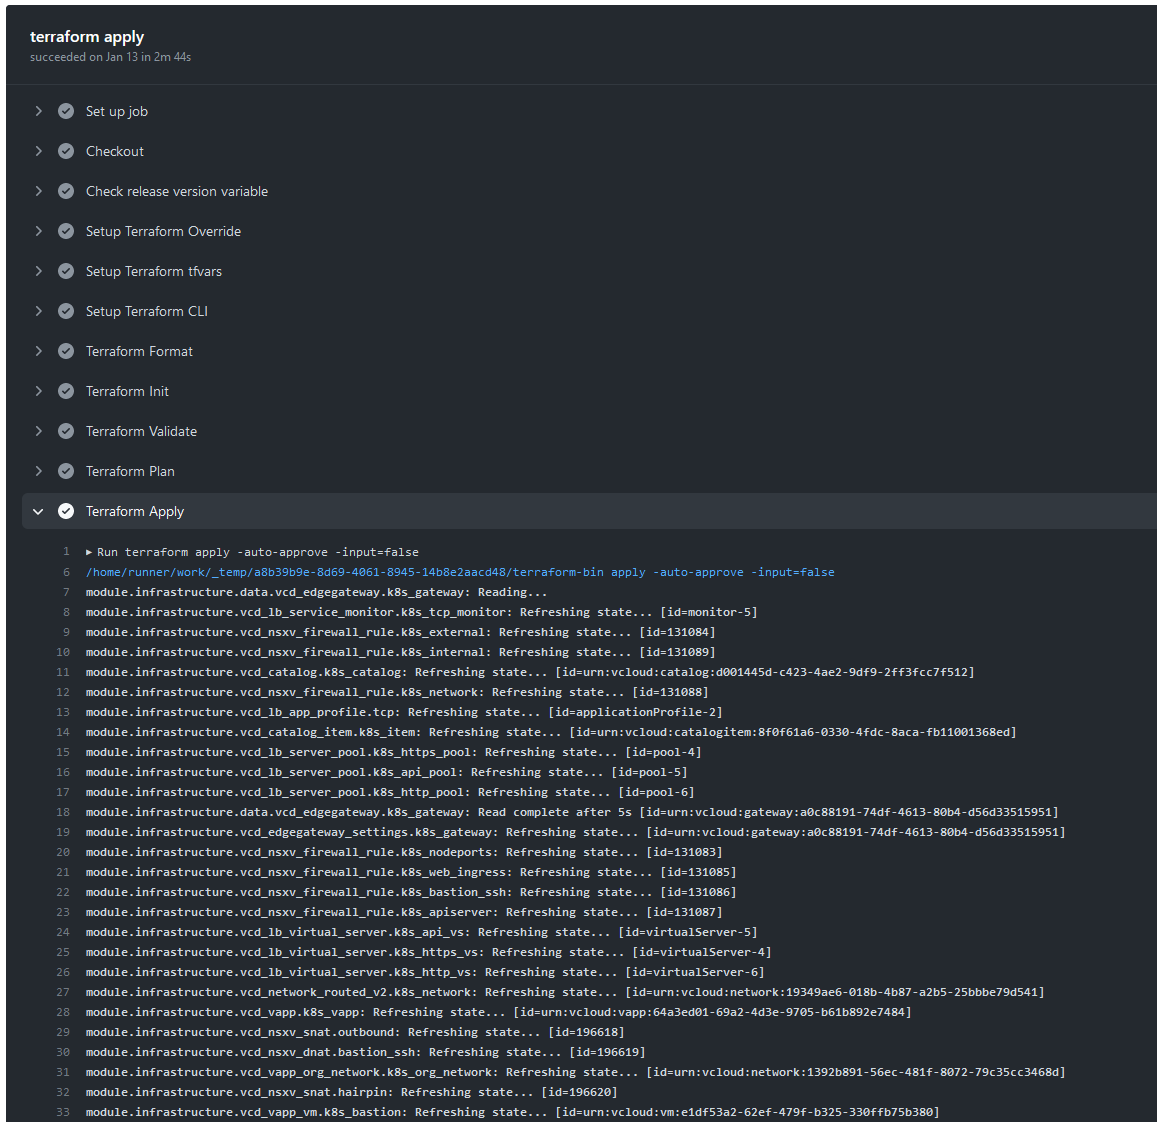
The first job defined in the pipeline is to check, validate and apply the entire Terraform module. This will will spin up and update any infrastructure parts, deploy and update the K3s cluster installation, and finally also deploy all additional Helm charts on the cluster.
The second job is a quick run of Sonobuoy against the resulting Kubernetes cluster. Sonobuoy is a simple diagnostic tool to check the state of a Kubernetes cluster by running a set of configuration tests in an accessible and non-destructive manner. It’s also used for the CNCF Certification of a cluster.
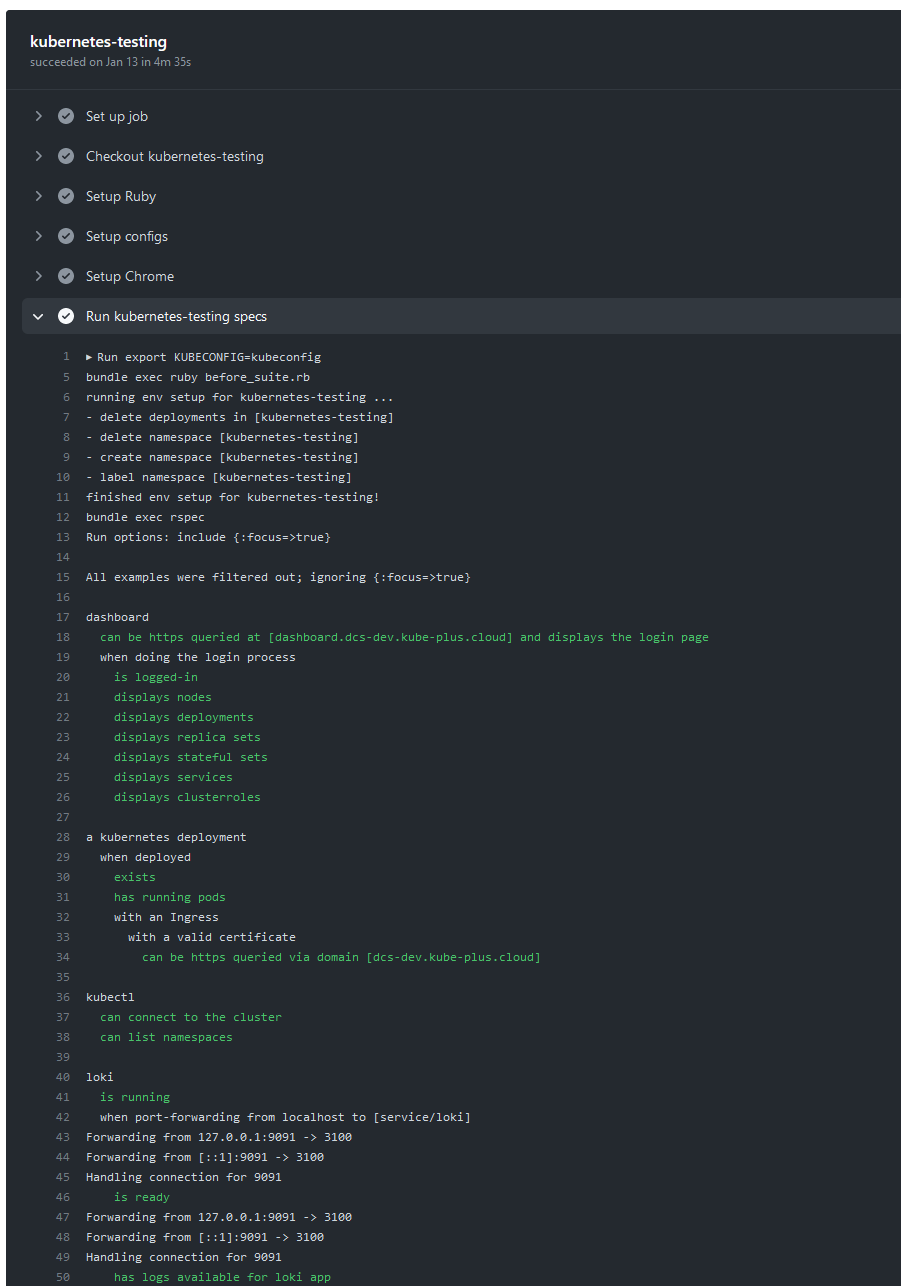
And as a final third job we run the Kubernetes-Testing end-to-end test suite, which covers all the actual deployments and their functionality on the Kubernetes cluster, ranging from using the dashboard, testing grafana, checking for correct logforwarding, metric ingestion, PVC’s with longhorn, etc..
The result
Here’s an excerpt from one of the workflow definitions for automated building, deployment and end-to-end testing of the Terraform module, with annotated comments:
name: Update Development cluster

on:
  push:
    branches: [ develop ] # only act on the "develop" branch

jobs:
  terraform-apply: # deploy all infrastructure, kubernetes and deployments
    name: 'terraform apply'
    runs-on: ubuntu-latest

    steps:
    - name: Checkout
      uses: actions/checkout@v3

    # prepare tfvars configuration data
    - name: Setup Terraform tfvars
      if: github.ref == 'refs/heads/develop' # only run this step if we are on the "develop" branch
      env:
        TF_TFVARS: ${{ secrets.TF_TFVARS }}
      run: echo "${TF_TFVARS}" > terraform.tfvars

    - name: Setup Terraform CLI
      uses: hashicorp/setup-terraform@v2
      with: # setup Terraform Cloud token, we store the tfstate there instead of locally
        cli_config_credentials_token: ${{ secrets.TF_API_TOKEN }}
        terraform_version: ~1.2.8

    # prepare the environment, download all provider plugins and dependencies
    - name: Terraform Init
      id: init
      run: terraform init

    # update all infrastructure, the kubernetes cluster and its deployments
    - name: Terraform Apply
      if: github.ref == 'refs/heads/develop' # only run this step if we are on the "develop" branch
      run: terraform apply -auto-approve -input=false

    # remove all sensitive files again
    - name: Cleanup
      if: ${{ always() }} # always run this step, even if earlier steps failed
      run: |
        rm -f kubeconfig || true
        rm -f terraform.tfvars || true

  sonobuoy-run: # run a quick sonobuoy test against the kubernetes cluster
    name: 'sonobuoy run'
    needs: [ terraform-apply ] # configure this job to be a follow-up of the one above
    runs-on: ubuntu-latest

    steps:
    - name: Checkout
      uses: actions/checkout@v3

    # prepare the kubeconfig for sonobuoy to use
    - name: Setup kubeconfig
      if: github.ref == 'refs/heads/develop' # only run this step if we are on the "develop" branch
      env:
        KUBECONFIG: ${{ secrets.KUBECONFIG }}
      run: echo "${KUBECONFIG}" > kubeconfig

    # only run a "quick" test for simplicity
    - name: Run Sonobuoy
      run: |
        wget --quiet https://github.com/vmware-tanzu/sonobuoy/releases/download/v0.56.10/sonobuoy_linux_amd64.tar.gz
        tar -xvzf sonobuoy_0.56.10_linux_amd64.tar.gz
        chmod +x sonobuoy
        export KUBECONFIG=kubeconfig
        ./sonobuoy delete --wait || true
        ./sonobuoy run --mode quick --wait --plugin-env=e2e.E2E_EXTRA_ARGS=--non-blocking-taints=CriticalAddonsOnly
        ./sonobuoy status
        results=$(./sonobuoy retrieve)
        ./sonobuoy results $results
        ./sonobuoy delete --wait

    # remove all sensitive files again
    - name: Cleanup
      if: ${{ always() }} # always run this step, even if earlier steps failed
      run: |
        rm -f kubeconfig || true

  kubernetes-testing: # run kubernetes end-to-end testing suite
    name: 'kubernetes-testing'
    needs: [ sonobuoy-run ] # configure this job to be a follow-up of the one above
    runs-on: ubuntu-latest

    steps:
    - name: Checkout kubernetes-testing
      uses: actions/checkout@v3
      with: # get kubernetes-testing test suite from github
        repository: swisscom/kubernetes-testing
        ref: master

    # prepare the config files for the test suite
    - name: Setup configs
      if: github.ref == 'refs/heads/develop' # only run this step if we are on the "develop" branch
      env:
        KUBECONFIG: ${{ secrets.KUBECONFIG }}
        TESTING_CONFIG: ${{ secrets.TESTING_CONFIG }}
      run: |
        echo "${KUBECONFIG}" > kubeconfig
        echo "${TESTING_CONFIG}" > config.yml

    # the test suite needs chrome and chromedriver to run headless web-browser tests
    - name: Setup Chrome
      uses: ./.github/actions/setup-chrome

    - name: Run kubernetes-testing specs
      run: |
        export KUBECONFIG=kubeconfig
        make test

    # remove all sensitive files again
    - name: Cleanup
      if: ${{ always() }} # always run this step, even if earlier steps failed
      run: |
        rm -f kubeconfig || true
        rm -f config.yml || true
Screenshots
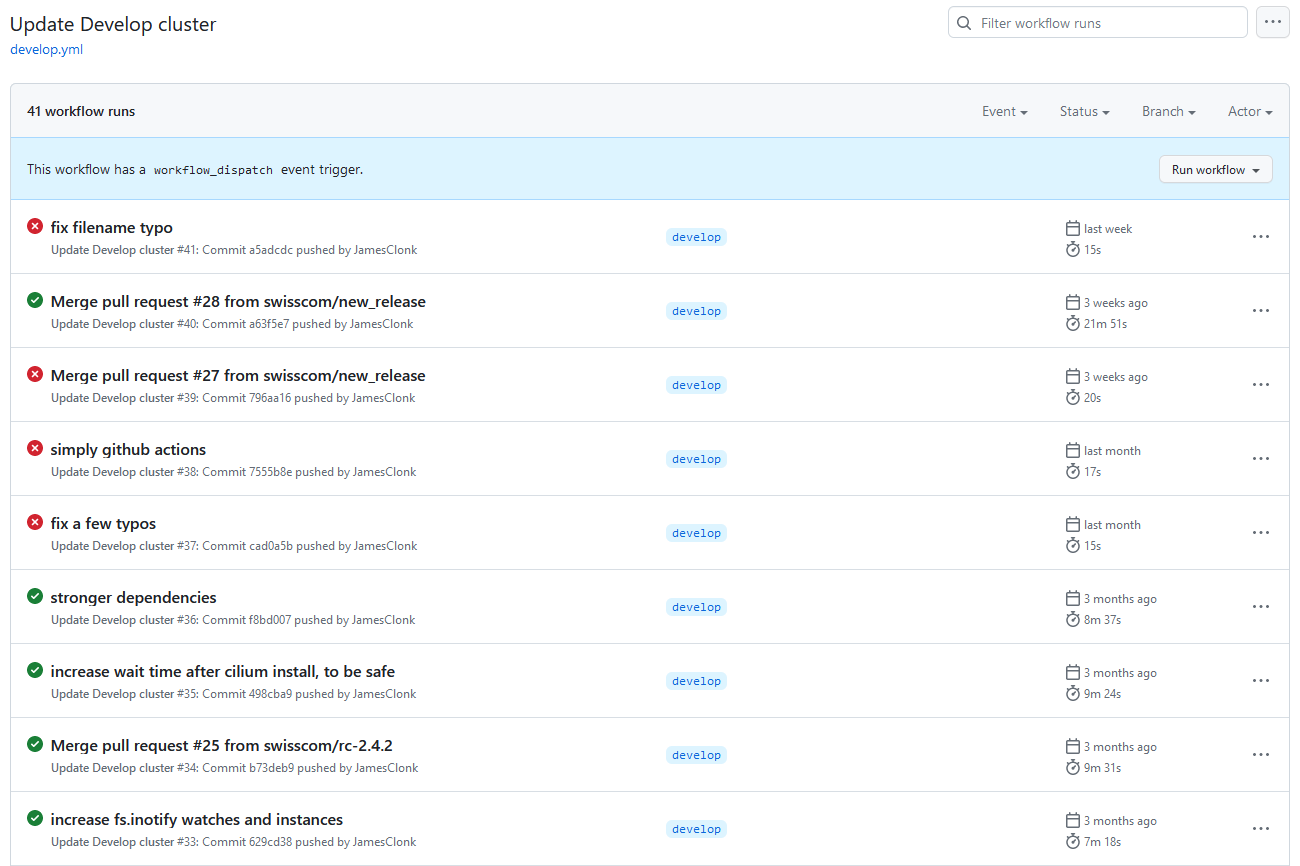
I couldn’t resist to also add some screenshots of how that workflow actually looks like in action, taken from develop.yml GitHub Action:
Workflow History / Runs
Workflow
Terraform Apply
End-to-End Testing
Looks like I had a lot of fun with this project, doesn’t it? 😄